Showing posts with label Crafts. Show all posts

Friday, January 4, 2013

Granny Square Afghan

Now that the holidays are over I can finally share the crochet afghan I made for J this year!  I didn't set out to make him a blanket at all, but one thing lead to another.  Originally all I had hoped to do was figure out how to make a granny square and then practice until I got good at them.  Well, I did that and ended up with a pile of granny squares!  No big deal though, I still wanted to learn how to use multiple colors so I continued adding to the pile.

Before I knew it there were enough squares to make a small couch blanket. And then I realized that I had been crocheting with all of J's favourite colors! I'm telling you it was fate!  After getting a nice neutral cream colored yarn for borders and joining, I had a very nice handmade gift.


Voila!  I love how the afghan turned out!


The granny square is so easy to do & looks wonderful.


J was thrilled when he opened it & I'm glad he loves it!

The blanket is six squares by six squares which is just enough for one person to cuddle up with on the couch.  Each granny square is five rounds without the border.  The cream border on each square is simply one round of single crochet.  Once each square had a border I connected the squares in larger squares of four, and then crocheted each four square patch together.  I kept things easy and consistent by using a single crochet to join everything.  To finish it off there are two rounds of single crochet one the outside edge.  Too easy!

This is the first granny square afghan I've done and I'm very pleased with the result.  I've already started another!  Thanks for stopping by!

Happy Scrapping!  Candice

Wednesday, October 24, 2012

Bubble Painting

Since E & I had so much success with our first Pinterest inspired craft project we decided to test another.  This one was even messier than the first, which made E love it that much more!

In the spotlight this time?  Painting with bubbles!  This craft was even cheaper than the first.  I had a few mini bottles of bubbles left over from birthday party treat bags and a pile of canvases.  All we needed to get was food colouring.  E chose the neon box and we ended up with day glow pink, green, yellow and blue.  I mixed about 20 drops of color into each bubble bottle.  What can I say?  I like bright and bold colors!

Since this craft can go either way depending on wind and bubble blower coordination I recommend wearing something that you wouldn't mind getting stained.  Just in case!

It was a typically windy day here so I chose the front porch as our creation station.  E had a blast blowing bubbles and creating his masterpiece!  We didn't get any nice, round bubble burst circles but neither of us cared.  This craft was fun, easy and gave us the chance to spend the rest of the day with neon fingertips!

Blowing bubbles onto canvas is "serious" business!

How great are these colors?

I love the final product - very cool!


How cool is this?  I definitely give this craft a 10 out of 10, it's fun, easy, cheap and the results are fantastic!  Together with our two balloon painting canvases (see them here) and our crayon melting canvass (see it here) we are primed to have a gorgeous art wall.  That is of course, if I ever manage to find just the right frames!

Happy Scrapping!  Candice

Sunday, October 21, 2012

Crazy Crayon Melting

I'm back again with another Pinterest inspired summer craft!  Lately I have seen melted crayon art everywhere I turn.  On canvas, pumpkins, paper, basically anything that will stay still!  The effects are beautiful and unpredictable, so each piece is unique.

Of course I had to know if this craft was going to live up to all the hype.  I began by using hot glue to adhere the crayons along the top of our last canvas.  Then E & I headed to the front porch, canvas in tow and armed with my hair dryer.  All the instructions I have read advise to keep the dryer (or heat gun) on low heat.  This is supposed to prevent any hot wax splatter. Since I'm all for not getting my son or myself burnt I followed this tip.

After more than 15 minutes with no joy I took over and cranked up the heat. That's when things got melty and crazy!  E took over and had a blast melting those crayons to the bitter end.  Overall the craft was a ton of fun and turned out quite beautiful.

Finally we were getting somewhere!

Isn't this amazing?  E picked out the order of the colors  & we're thrilled with the result!

This craft was amazing and so fun!  I've been keeping my eye out for the perfect frame as we can't wait to hang this masterpiece in the living room. Have you tried anything with this crayon melting craze?

Happy Scrapping!  Candice

Friday, October 19, 2012

Purse Charms

Last year I decided to get my creative juices flowing and craft a few gifts for my family.  Even though I haven't tried my hand at jewellery making since I was a kid and stringing beads on neon Gimp, I gave it a shot.

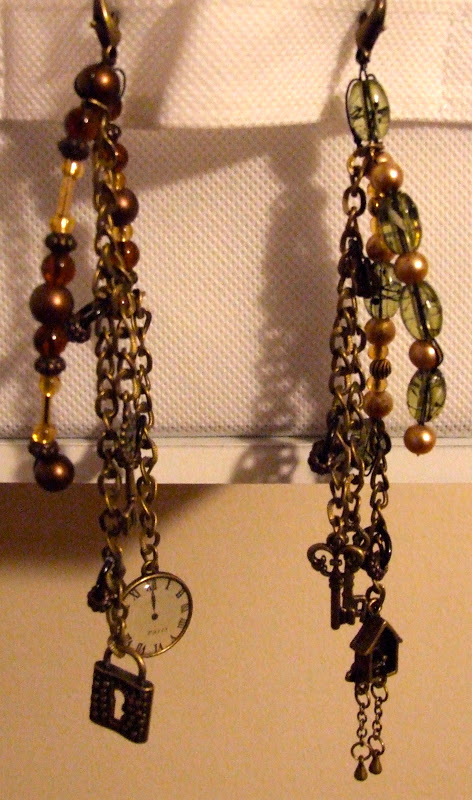
My fabulous Mom and Grandma love bling like I do so custom purse charms were a natural choice.    It wasn't the easiest craft I've tried but I pulled it off.  I used various beads, charms and personal color schemes.  Neutral browns for my Mom and funky greens for my Grandma.  The purse charms were a huge hit and I will continue to practice my jewellery skills.

I love all the little charms!  There's clocks, keys, birdhouses and more!


This is the brown tone charm

This is the green tone charm

I do have a mish mash of odds and ends leftover from making these flashy bits of flair so I may make one for my own purse!  What do you think of them?

Happy Scrapping!  Candice

Tuesday, October 16, 2012

Crochet Scarves

I love to crochet!  Currently I can only go in straight lines but I love to crochet nonetheless.  As a child my Grandmother taught me to crochet, or at least she gave it her best shot.  I may not have been the best student!  I've always admired how creative she is and every Christmas she makes us all the most beautiful crochet doilies.  I dropped the hobby until the end of my pregnancy when I realized I wanted to crochet a baby blanket.  Blame it on nesting urges I guess!

Armed with a couple books and a hook from Grandma I slowly figured it out. Now it's years later and I'm still mastering the straight stitch.  To accompany the purse charms for last Christmas I also crocheted scarves for my Mom, Dad, Grandma and Grandpa.  The pictures below are of the scarves for the ladies.  The fiery red blend was made for my Mom as those colors suit her perfectly.  And the very mod ombre green was for my Grandma who adores green.


Don't worry!  I cut the finishing strings before gifting!


To add some flair I made flowers and added buttons - fun!

The manly scarves were very simple, just blue and grey.  They were a holiday favourite and I'm sure the gang looks stylish when the weather gets chilly!

Right now I'm working on some kooky leg warmers for myself.  I know, how 80's of me!  Once finished, they'll definitely keep me warm around the house! And maybe one day I learn how to work in a round, ha!

Happy Scrapping!  Candice

Tuesday, October 9, 2012

Painting With Balloons

Throughout August I decided to try a plethora of fun crafts with E, most of which I initially saw on Pinterest.  If you've ever gotten lost on that site you can back me up here - there are so many fantastic craft ideas!

Since the weather was gorgeous and boys love nothing more than making a mess, I opted for crafts that could be done outside.  The messier the better! Our first project was splatter painting with mini balloons.

I have to be honest, I was probably more excited than E to try it out.  The plan was simple - fill small balloons with paint, tack them to a board, throw darts at them and watch the paint fly.  We gathered our materials:  paint, water balloons, tacks and canvas.  Luckily, we found everything at our local dollar store.  Not only was this craft tons of fun, it was super cheap also!  The only item we struck out on were darts.  I couldn't find cheap, plastic darts to save my life!  My solution?  Finishing nails taped to the end of a mini hockey stick! It worked great!

Here's what we started with:  (the canvas is 8 x 10)

The garage door is perfect since it's so easy to clean!

This was our second canvas.  See all the splatter from canvas #1?

And here's the finished products:

Canvas #2 on left, Canvas #1 on right
E & I had a wonderful afternoon making this craft.  Now we have amazing homemade artwork to hang in our living room!

Did you do any fun crafts this summer?  Have you tried balloon painting?

Happy Scrapping!  Candice

Wednesday, October 26, 2011

Fun Fall Inspiration

Hello blog land!  Today's post may be all about a wonderful project that inspired me to create a new table centre piece, but I also have very cool news.  I won a new Chic & Scary Cricut cartridge from a fabulous blog giveaway!  Three cheers for me!  I'm overjoyed.....I never win anything!  Yay!
As soon as get permission to post a link to the amazing blog that hosted the giveaway, I will share it.  Trust me, this is a creation location you don't want to miss!

Speaking of not missing out on creativity, I want to share another blog post that recently inspired me.  Check out this simply fabulous project by Becky on The Popsicle Tree .  How sweet is that?  I immediately knew I had to make one, so off I went.  I couldn't find any florist wire, so I substituted thin wooden dowels.  That seemed like a great idea....until I had to arrange them in the mason jar!  A little trickier than I had thought =)

Here's what I used:  various cardstock colors, Plantin Schoolbook cart, Hoot N' Holler cart, Celebrate With Flourish cart, clear & brown Smootch Spritz, ribbon, hot glue, rocks & mason jar.

What do you think?

Right now the mason jar is placed in these bowls so the cats don't knock it over =)

I wish real fall leaves were shimmery!

Hoo-Hoo doesn't adore owls?


As I mentioned, while trying to arrange the dowels I suddenly realized why Becky used wire.  It must have been so much simpler to fiddle with.  Although the dowels were fussy, the rocks helped.  I love this new decor addition to my craft room/dining room!

Thanks for the inspiration Becky!

Happy Scrapping & Spooking!